
Peanut Butter Easter Egg Recipe
Introduction
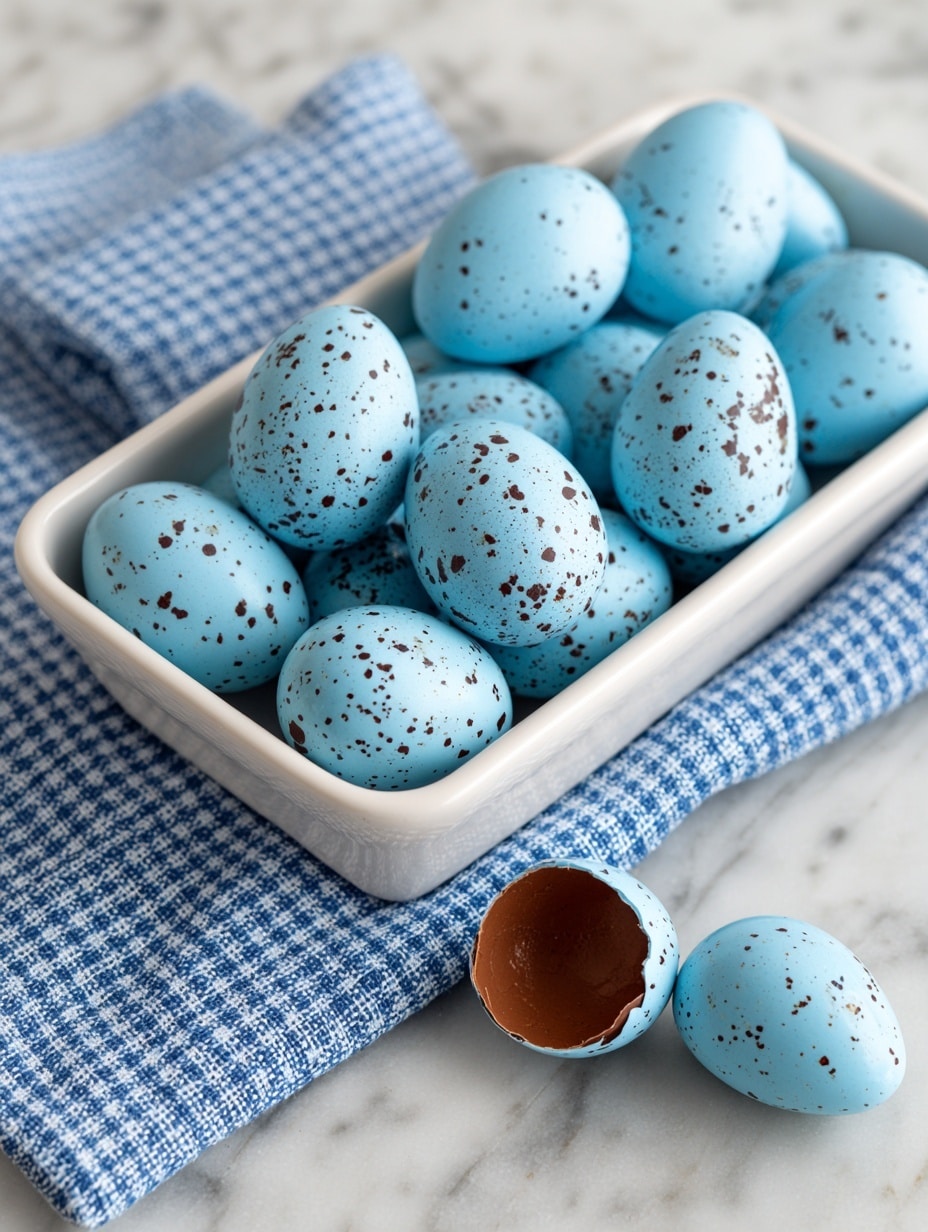
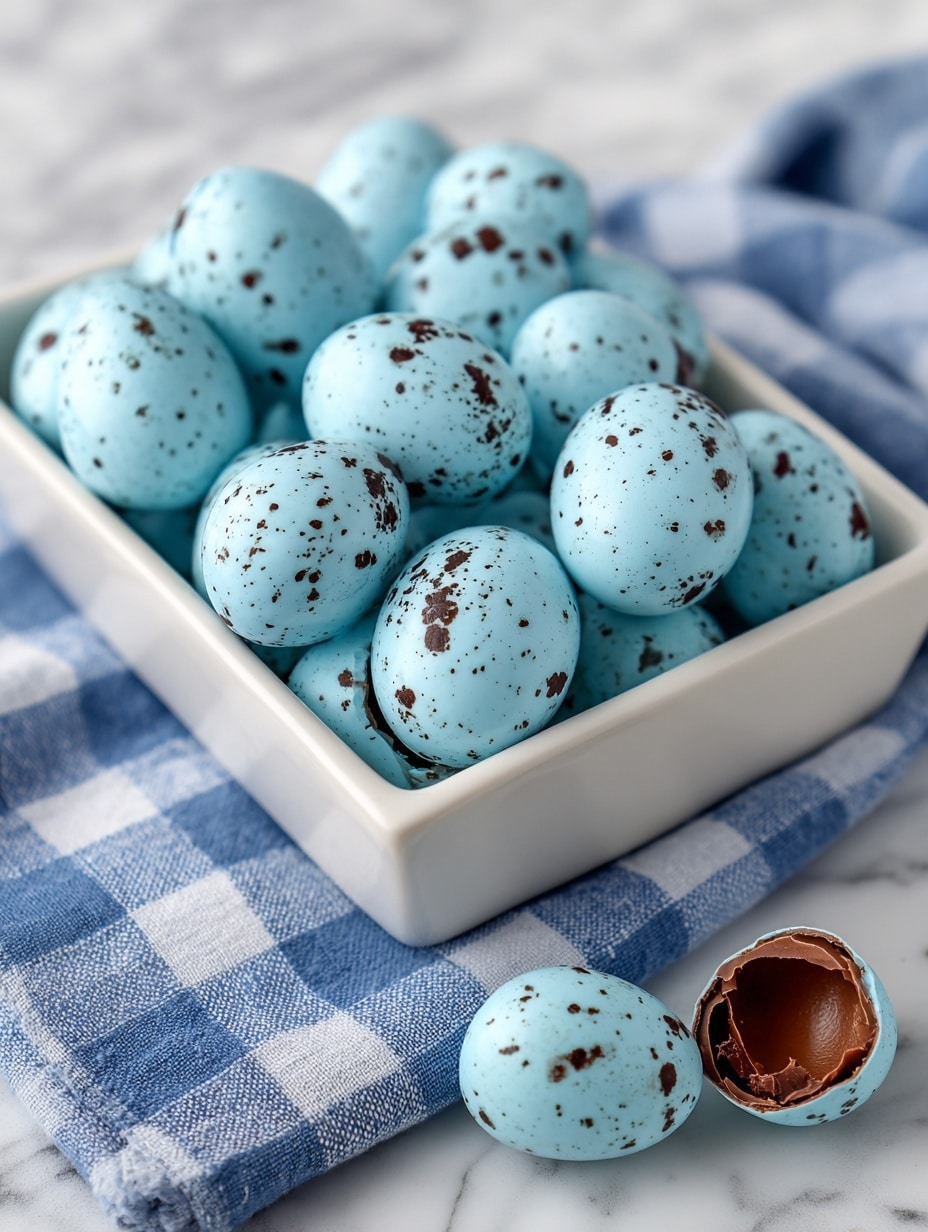
These Peanut Butter Easter Eggs are a delightful homemade treat combining creamy peanut butter filling with a smooth, colorful white chocolate coating. Perfect for celebrating the season or gifting to loved ones, they bring a fun twist to traditional Easter sweets.
Ingredients
- 1 1/4 cups natural, runny peanut butter (no sugar added)
- 1/4 cup maple syrup
- 1/4 cup powdered sugar
- 1/3 cup almond flour
- 1/2 teaspoon vanilla extract
- Pinch of salt
- 8 ounces white chocolate melting wafers (Ghirardelli brand recommended)
- 2 teaspoons coconut oil
- 1/2 teaspoon blue spirulina
- 1/4 teaspoon matcha powder (or use a 2:1 ratio of any blue and green food dye)
- 1 teaspoon cocoa powder
- 1 tablespoon water
Instructions
- Step 1: In a mixing bowl, beat together the natural peanut butter, maple syrup, powdered sugar, almond flour, vanilla extract, and a pinch of salt until fully combined and smooth, creating a creamy filling.
- Step 2: Portion the peanut butter filling into 2-tablespoon portions each. Roll each portion into a ball with your hands, then shape it into an oval to resemble an egg. Place the shaped eggs on a parchment paper-lined baking sheet and freeze to firm up while preparing the coating.
- Step 3: In a small bowl, whisk together the cocoa powder and water until smooth, then set aside for later use to add speckles.
- Step 4: Combine the white chocolate melting wafers and coconut oil in a microwave-safe bowl. Microwave in 15-20 second intervals, stirring well after each, until completely melted and smooth.
- Step 5: Whisk in blue spirulina and matcha powder (or your choice of blue and green food coloring) to achieve a robin’s egg blue color. Pour the colored chocolate into a short glass or similar container for easy dipping.
- Step 6: Using a toothpick, skewer each semi-frozen peanut butter egg and dip it into the melted colored white chocolate. Let the excess chocolate drip off. Once the chocolate begins to harden but is not fully set, place the egg on the parchment-lined sheet and carefully remove the toothpick immediately to avoid cracking the coating. Repeat with all eggs.
- Step 7: Dip a pastry brush into the cocoa powder and water mixture and, holding it about 8 inches above the eggs, flick the tip to create delicate speckles on the white chocolate coating. Be prepared for some mess and wear an apron if desired.
- Step 8: Refrigerate the coated eggs for about 10 minutes until the chocolate fully sets and dries.
Tips & Variations
- Use natural, runny peanut butter for the creamiest filling and best flavor.
- Adjust the amount of powdered sugar to sweeten the filling to your preference.
- For different colors, swap blue spirulina and matcha powder with your favorite natural food colorings.
- If you don’t have a pastry brush, use a spoon to flick the speckle mixture onto the eggs.
- Ghirardelli white chocolate melting wafers melt smoothly and create a perfect shell, but any quality melting wafers will work.
Storage
Store the finished peanut butter eggs in an airtight container in the refrigerator for up to two weeks. For longer storage, freeze them for up to 4 months. When ready to serve, let frozen eggs defrost slightly at room temperature to soften the filling without melting the chocolate coating.
How to Serve
Serve this delicious recipe with your favorite sides.
FAQs
Can I use regular peanut butter instead of natural?
Yes, but natural peanut butter without added sugar or oils gives the best texture and flavor for the filling. Regular peanut butter may make the filling sweeter and a bit denser.
Is it necessary to freeze the peanut butter eggs before coating?
Freezing the shaped eggs helps them firm up, making it easier to dip in the chocolate without breaking or melting the filling. It also helps the chocolate set faster and evenly around the eggs.
Print
Peanut Butter Easter Egg Recipe
- Total Time: 35 minutes
- Yield: 14 servings 1x
- Diet: Gluten Free
Description
This Peanut Butter Easter Egg recipe combines creamy, naturally sweetened peanut butter filling with a smooth, colorful white chocolate coating speckled for a festive touch. Perfect for holiday treats, these homemade eggs are easy to shape, dip, and decorate, resulting in delightful bite-sized confections that can be stored for weeks in the refrigerator or months in the freezer.
Ingredients
Peanut Butter Filling
- 1 1/4 cups natural, runny peanut butter (no sugar added)
- 1/4 cup maple syrup
- 1/4 cup powdered sugar
- 1/3 cup almond flour
- 1/2 teaspoon vanilla extract
- Pinch of salt
Coating and Decoration
- 8 ounces white chocolate melting wafers (Ghirardelli brand recommended)
- 2 teaspoons coconut oil
- 1/2 teaspoon blue spirulina
- 1/4 teaspoon matcha powder (or use a 2:1 ratio of any blue and green food dye)
- 1 teaspoon cocoa powder
- 1 tablespoon water
Instructions
- Make the Peanut Butter Filling: In a mixing bowl, beat together the natural peanut butter, maple syrup, powdered sugar, almond flour, vanilla extract, and a pinch of salt until fully combined and smooth, creating a creamy filling.
- Shape the Eggs: Portion the peanut butter filling into 2-tablespoon portions each. Roll each portion into a ball with your hands, then shape it into an oval to resemble an egg. Place the shaped eggs on a parchment paper-lined baking sheet and freeze to firm up while preparing the coating.
- Prepare Speckle Mix: In a small bowl, whisk together the cocoa powder and water until smooth, and set aside for later use to add speckles.
- Melt and Color Chocolate: Combine the white chocolate melting wafers and coconut oil in a microwave-safe bowl. Microwave in 15-20 second intervals, stirring well after each, until completely melted and smooth. Whisk in blue spirulina and matcha powder (or your choice of blue and green food coloring) to achieve a robin’s egg blue color. Pour the colored chocolate into a short glass or similar container for easy dipping.
- Coat the Eggs: Using a toothpick, skewer each semi-frozen peanut butter egg and dip it into the melted colored white chocolate. Let the excess chocolate drip off. Once the chocolate begins to harden but is not fully set, place the egg on the parchment-lined sheet and carefully remove the toothpick immediately to avoid cracking the coating. Repeat with all eggs.
- Add Speckles: Dip a pastry brush into the cocoa powder and water mixture and, holding it about 8 inches above the eggs, flick the tip to create delicate speckles on the white chocolate coating. Be prepared for some mess and wear an apron if desired.
- Set and Store: Refrigerate the coated eggs for about 10 minutes until the chocolate fully sets and dries. Store finished eggs in an airtight container in the refrigerator or freeze for up to 4 months. Let frozen eggs defrost slightly before serving.
Notes
- Make sure to use natural, runny peanut butter without added sugar for the best flavor and texture.
- Freezing the shaped peanut butter eggs before dipping helps the coating set quickly and prevents cracking.
- Use a microwave-safe bowl for melting chocolate and stir frequently to avoid burning.
- The speckle decoration is optional but adds a charming, realistic touch to mimic robin’s eggs.
- Store eggs in an airtight container to maintain freshness and prevent moisture absorption.
- Allow frozen eggs to defrost slightly at room temperature before serving for best texture.
- Prep Time: 15 minutes
- Cook Time: 20 minutes
- Category: Dessert
- Method: No-Cook
- Cuisine: American
Keywords: Peanut butter eggs, Easter treats, no-bake candy, homemade Easter eggs, gluten free dessert, white chocolate coating, festive candy

