Description
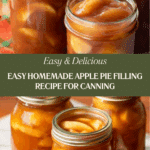
This classic homemade apple pie filling is perfect for canning and enjoying year-round. With tender apple slices simmered in a sweet cinnamon and nutmeg spiced sauce, this filling is ideal for pies, cobblers, or as a topping for desserts. The recipe involves cooking the sauce on the stovetop and preserving it safely through water bath canning.
Ingredients
Scale
Apple Pie Filling
- 7 lbs apples (peeled, cored, and sliced)
- 3½ cups sugar
- 1 cup cornstarch or Clear Jel
- 10 cups water
- 3 tablespoons lemon juice
- 2 teaspoons cinnamon
- ¼ teaspoon nutmeg
Instructions
- Prepare the sauce: In a large stock pot, combine the water, sugar, cornstarch (or Clear Jel), cinnamon, and nutmeg. Stir well to incorporate all ingredients evenly.
- Cook the sauce: Place the pot over medium-high heat and cook the mixture, stirring constantly, until the sauce thickens to a smooth consistency. Once thickened, remove from heat and stir in the lemon juice to add brightness and prevent browning.
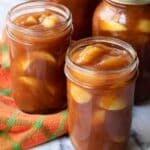
- Fill jars with apples: Place peeled, cored, and sliced apples into hot, sterilized canning jars, filling them adequately but leaving enough headspace for the liquid.
- Add sauce to jars: Using a ladle and funnel, carefully pour the hot sauce mixture over the apple slices in each jar, leaving about 1 inch of headspace from the top of the jar to allow for expansion during processing.
- Seal jars: Wipe the rims of the jars with a clean cloth to ensure a good seal. Place sealing lids and screw caps tightly onto each jar to prepare for processing.
- Process jars in water bath: Submerge the jars in a boiling water bath canner and process them for 20 minutes to ensure proper sealing and preservation.
- Rest jars post-processing: After processing, turn off the burner and carefully lift the rack to rest jars on the edge of the canner. Let them sit for 10 minutes to gradually cool.
- Cool jars completely: Remove jars from the canner and place them upright on a dry towel. Allow them to cool completely at room temperature before handling further.
- Check seals: Once cool, test each jar’s seal by tapping the lid; a popping noise indicates a failed seal. Any unsealed jars should be refrigerated and can be reprocessed if desired. Refrigerated jars should be consumed within one week after opening.
- Store sealed jars: Properly sealed jars can be stored in a cool, dark place for up to one year, making homemade apple pie filling available whenever you need it.
Notes
- Ensure jars and lids are properly sterilized to prevent spoilage.
- You can substitute Clear Jel for cornstarch for a more stable thickening suitable for canning.
- Adjust sugar to taste depending on the tartness of your apples.
- If you do not have a water bath canner, use a large pot with a rack to process jars safely.
- Use firm, tart apples like Granny Smith or Jonathan for the best texture and flavor.
- Processed jars stored properly at room temperature can last up to one year.
- Prep Time: 15 minutes
- Cook Time: 35 minutes
- Category: Canning
- Method: Stovetop
- Cuisine: American
Keywords: apple pie filling, homemade apple filling, canning recipe, apple pie, preserving fruit, water bath canning