
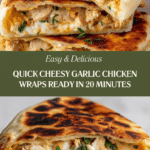
Easy Cheesy Garlic Chicken Wraps Recipe
Introduction
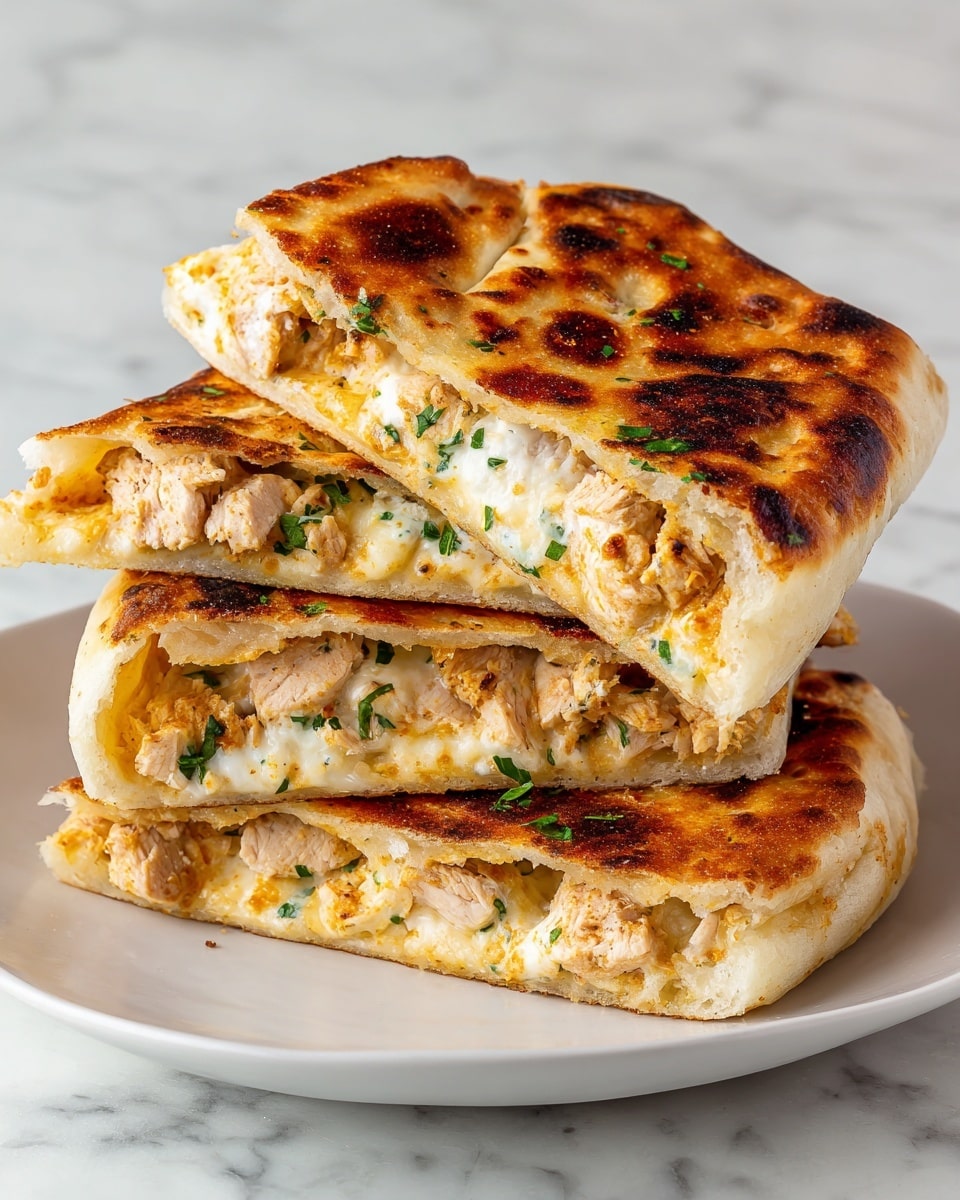
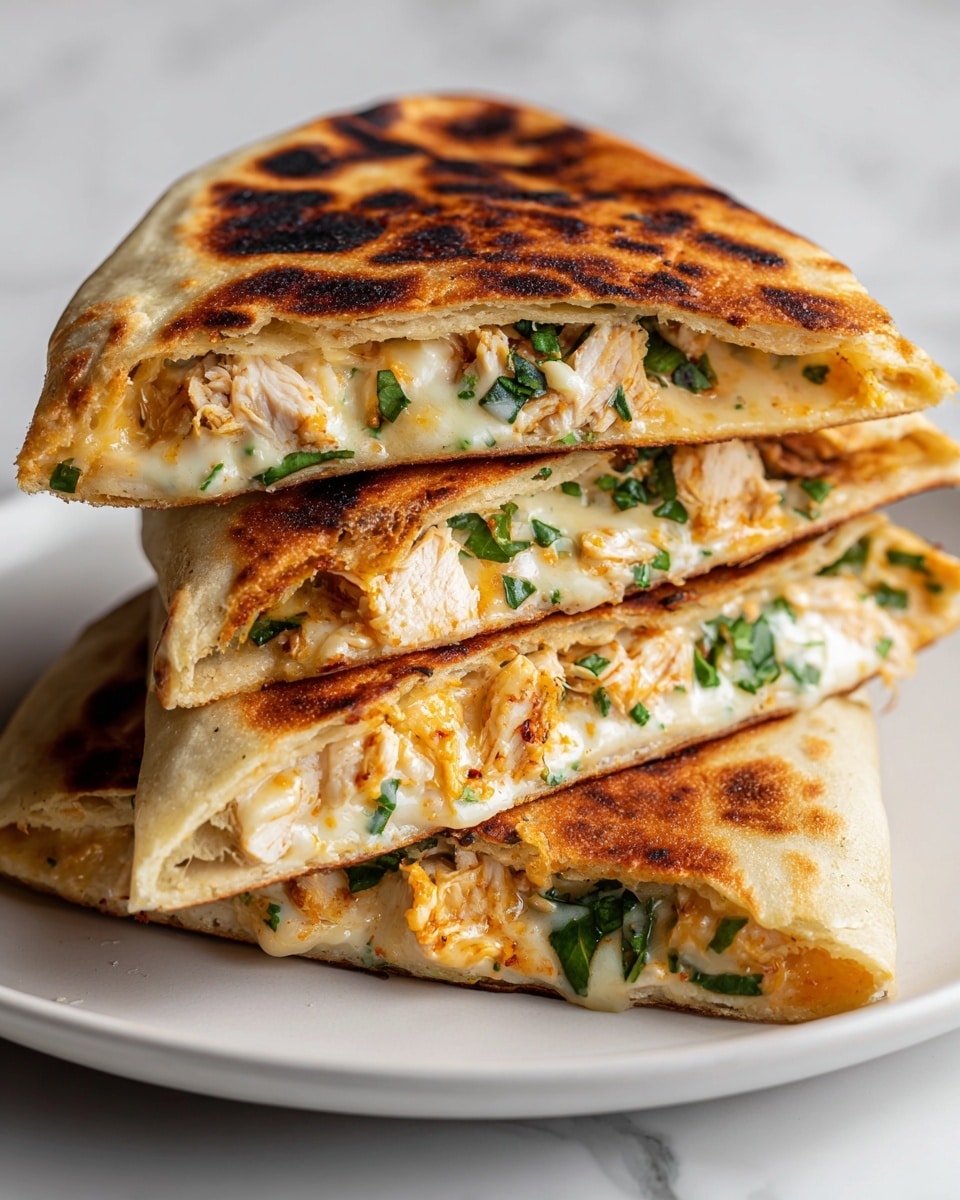
These Easy Cheesy Garlic Chicken Wraps are a quick and delicious meal perfect for busy weeknights. Ready in just 20 minutes, they combine tender chicken, creamy garlic sauce, and melted cheese for a satisfying flavor-packed wrap.
Ingredients
- 1 chicken breast (cut into bite-size cubes)
- 3 garlic cloves (finely minced)
- Salt (to taste)
- Freshly ground black pepper (to taste)
- ½ teaspoon paprika
- 1 tablespoon olive oil
- 1 teaspoon butter
- 3 tablespoons mayonnaise
- 3 tablespoons Greek yogurt
- 1 garlic clove (finely minced)
- ½ teaspoon freshly squeezed lemon juice
- 2 large flour tortillas
- 1 teaspoon butter
- 1 tablespoon finely chopped parsley
- Freshly ground black pepper (to taste)
- 2 tablespoons freshly shredded mozzarella cheese
- 2 tablespoons freshly shredded cheddar cheese
- 2 tablespoons finely chopped green onions
Instructions
- Step 1: Prepare the sauce by whisking together the mayonnaise, Greek yogurt, minced garlic, and lemon juice in a small bowl until smooth. Set aside.
- Step 2: In a separate bowl, combine the chicken cubes with the minced garlic, paprika, salt, and black pepper. Mix well and set aside.
- Step 3: Heat a pan over medium heat and add the olive oil and butter. Once the butter melts, add the chicken in a single layer. Cook without stirring for about 2 minutes until the bottom is golden. Flip and cook for 1 more minute until just cooked through, being careful not to overcook.
- Step 4: Warm the tortillas in a dry pan or microwave until pliable.
- Step 5: Spread the prepared garlic sauce evenly over each tortilla. Sprinkle with chopped parsley and a pinch of black pepper. Add the cooked chicken on top, then layer with mozzarella, cheddar, and green onions. Drizzle a little more sauce over the filling.
- Step 6: Fold the sides of the tortilla inward over the filling, then roll tightly to seal the wrap.
- Step 7: Heat a little butter in a pan. Place the wrap seam-side down and toast for 1–2 minutes per side until the wrap is lightly crisp and the cheese has melted. Alternatively, use a sandwich press or panini maker to toast until crisp and melted.
- Step 8: Slice the wraps in half and serve warm, with extra garlic sauce on the side if desired.
Tips & Variations
- For extra flavor, marinate the chicken in the seasoning mixture for 15 minutes before cooking.
- Swap the chicken for cooked shrimp or grilled vegetables for a different twist.
- Add a dash of hot sauce to the garlic sauce for a spicy kick.
- Use whole wheat tortillas for a healthier option.
Storage
Store leftover wraps tightly wrapped in the refrigerator for up to 2 days. Reheat in a pan or sandwich press to crisp the wrap and melt the cheese again. Avoid microwaving to keep the wrap from becoming soggy.
How to Serve
Serve this delicious recipe with your favorite sides.
FAQs
Can I use pre-cooked chicken for this recipe?
Yes, pre-cooked chicken can be used to save time. Simply warm it in the pan with the seasoning before assembling the wraps.
Can I prepare these wraps ahead of time?
You can assemble the wraps ahead but it’s best to toast them just before serving to keep the tortilla crisp and the cheese melted.
Print
Easy Cheesy Garlic Chicken Wraps Recipe
- Total Time: 20 minutes
- Yield: 2 servings 1x
Description
These Easy Cheesy Garlic Chicken Wraps take just 20 minutes to prepare and combine tender, flavorful chicken with a creamy garlic sauce and melted cheese, all wrapped in warm flour tortillas. Perfect for a quick lunch or dinner, these wraps are both satisfying and deliciously cheesy with a hint of fresh herbs and garlic.
Ingredients
Chicken and Seasoning
- 1 chicken breast, cut into bite-size cubes
- 3 garlic cloves, finely minced
- Salt, to taste
- Freshly ground black pepper, to taste
- ½ teaspoon paprika
- 1 tablespoon olive oil
- 1 teaspoon butter
Garlic Sauce
- 3 tablespoons mayonnaise
- 3 tablespoons Greek yogurt
- 1 garlic clove, finely minced
- ½ teaspoon freshly squeezed lemon juice
Wrap and Toppings
- 2 large flour tortillas
- 1 teaspoon butter (for toasting)
- 1 tablespoon finely chopped parsley
- Freshly ground black pepper, to taste
- 2 tablespoons freshly shredded mozzarella cheese
- 2 tablespoons freshly shredded cheddar cheese
- 2 tablespoons finely chopped green onions
Instructions
- Prepare the sauce: In a small bowl, whisk together mayonnaise, Greek yogurt, minced garlic, and lemon juice until smooth. Set aside to allow flavors to meld.
- Season the chicken: In another bowl, combine chicken cubes with minced garlic, paprika, salt, and freshly ground black pepper. Mix thoroughly to coat evenly and set aside.
- Cook the chicken: Heat a pan over medium heat and add olive oil and butter. Once the butter is melted, add the chicken in a single layer. Cook undisturbed for about 2 minutes until the underside is golden brown. Flip the chicken pieces and cook for an additional minute until just cooked through, ensuring the chicken stays juicy and tender.
- Warm the tortillas: Warm the flour tortillas briefly in a dry pan or microwave to make them pliable and easier to wrap.
- Assemble the wraps: Spread the prepared garlic sauce evenly over each tortilla. Sprinkle chopped parsley and a little freshly ground black pepper over the sauce. Add the cooked chicken on top, then evenly distribute shredded mozzarella, cheddar cheese, and chopped green onions. Drizzle a small amount of garlic sauce over the fillings.
- Wrap and roll: Fold the sides of the tortilla inward over the filling, then roll tightly from one end to the other to secure all ingredients inside.
- Toast the wraps: Brush a little butter onto the pan. Place each wrap seam-side down in the pan and toast for 1 to 2 minutes on each side until the tortilla is lightly crisp and the cheeses melted. Alternatively, use a sandwich press or panini maker for toasting until crisp and melted.
- Serve: Slice the wraps in half diagonally and serve warm with extra garlic sauce on the side for dipping.
Notes
- To prevent chicken from drying out, avoid overcooking; cook just until no longer pink inside.
- You can substitute flour tortillas with whole wheat or gluten-free tortillas if preferred.
- For extra flavor, add a pinch of chili flakes or smoked paprika to the chicken seasoning.
- Use fresh garlic for the best flavor in the sauce and chicken seasoning.
- Wraps can be prepared ahead and toasted just before serving for convenience.
- Prep Time: 10 minutes
- Cook Time: 10 minutes
- Category: Lunch
- Method: Stovetop
- Cuisine: American
Keywords: chicken wraps, cheesy garlic chicken, quick lunch, easy wraps, stovetop recipe
